Brad's homemade apple & beer bratwurst. This complete guide to Homemade Cider Vinegar will walk you through from start to finish. From using cultured apples to growing mother--you'll know it. See more ideas about homemade apple pies, apple recipes, homemade apple.
 Brad Pitt keeps a low-profile as touches down at JFK Airport before making his way to Paris Hilton and little sister Nicky are the perfect pastel pair while arriving to Gitano restaurant in the Big Apple.
Make those jams and jellies you've always dreamed of with my Homemade Apple Pectin recipe — it's Bitter, unripe, sour apples work best.
Think of biting into that apples and how much you would.
To make Brad's homemade apple & beer bratwurst you need 14 ingredients and just 21 steps. Here is how you cook it.
Brad Pitt keeps a low-profile as touches down at JFK Airport before making his way to Paris Hilton and little sister Nicky are the perfect pastel pair while arriving to Gitano restaurant in the Big Apple.
Make those jams and jellies you've always dreamed of with my Homemade Apple Pectin recipe — it's Bitter, unripe, sour apples work best.
Think of biting into that apples and how much you would.
To make Brad's homemade apple & beer bratwurst you need 14 ingredients and just 21 steps. Here is how you cook it.
Ingredients
- Prepare of pork butt.
- Prepare of pork fat.
- You need of Excalibur apple bratwurst seasoning packet.
- You need of large apples, peeled and cored.
- Prepare of garlic powder.
- It's of onion powder.
- It's of nonfat dry milk powder.
- It's of flat ale. I used Foster's.
- Prepare of Enough 32-35 mm hog casings for 25 lbs meat.
- Prepare of To cook.
- Prepare of Hoagie buns.
- You need of Swiss cheese.
- Prepare of Sauerkraut.
- It's of Deli mustard.
Photo about Homemade apple pie with steam as it cools on counter. This delicious homemade apple cider recipe is super-easy to make in the Crock-Pot, Instant Pot or on the stovetop. It's made simply with apples, warming spices, water, and your choice of sweetener. Apple cider vinegar is so good for you, and you wouldn't believe how easy it is to make homemade apple cider vinegar from apple scraps.
Brad's homemade apple & beer bratwurst instructions
- First step is to trim the pork butt. Trim off all of the fat and set aside. Cut the meat into chunks that will easily feed into your meat grinder. Weigh the meat. You need right around 17 lbs. Next weigh the fat that you trimmed from the pork butt. Add additional fat until you get around 8 lbs total. Cut fat into pieces that will easily feed in your meat grinder. Place both in the refrigerator to chill well. The closer your product is to freezing temperature, the easier it feeds..
- While meat is chilling, peel core and slice your apples. Set aside. Open the beer. Measure out 1 pint. Set aside in fridge to let it go flat..
- When meat is cold enough, start running it through your meat grinder. Use the 3/16 sized cutting plate for this project. I have a process for this that minimizes the amount of mixing needed later. Run 2 pieces of pork through the grinder. Then 1 piece of fat continue switching off to keep the mixture more even. Every once in a while run a piece of apple through the grinder as well. This is easier on the meat versus grinding all the ingredients separately then trying to evenly mix later..
- As your small pan under the grinder fills up, add it to a large canning pot and return it to the fridge. The key to making good time on this project is to make sure the meat stays very cold and doesn't warm up. Continue to grind until all product has been run through. Let meat chill in the fridge for a bit to stiffen up. Clean up your work station for the next step..
- When your meat has chilled, get a large roasting pan out. Use both bottom and lid to season the meat. Split the ground pork in half and add to both pans. Add half of the garlic powder and onion powder to each pan. Add half of the spice mixture to each pan. Add 3 oz of nonfat dry milk to each pan. Slowly mix the meat and seasoning together by hand. When spices start to incorporate, add 1 cup cold beer to each pan. Mix together well..
- Add a little meat from both pans back to the canning pot. Mix together. Repeat until all the meat is back in the pot and mixed together well. Return to the fridge to chill again. Clean work station again. Chill for a couple hours. At this point, make a test patty. Cook off in a frying pan. If seasoning needs adjustment, do it at this time..
- About 45 minutes before meat is ready, rinse all salt off of casings. Soak in a bowl of Luke warm water. Do not over soak the casings. There are several types of casings that can be used. I prefer the natural casings. Either sheep or hog. But sometimes they can be inconsistent. I have had sections of casings that are weaker than others, and some sections of casings that are misshapen. Keep an eye out for these problems..
- If you are looking for a more consistent casing, you can use a collagen casing. If you choose to go this route, do your research before making any purchase. There are several kinds. Some designed for more "snap" on the bite than others. Some will accept smoke, some will not. Be aware of the products. As far as the natural casings go, there are home packs, and tubed casings. The home packs are harder to deal with and require each individual casing to be rinsed inside and out..
- The tubed casings do not require this, and come packaged on a tube that easily allows the transfer of the casing onto the sausage horn. The tubed casings that I purchased were long enough to fill the entire 25 lbs of sausage into one casing. Most sausage horns are not long enough to handle that much casing at one time. Transfer as much casing onto the horn that will fit and cut casing with scissors..
- Set up your meat grinder with the sausage horn. Transfer as much casing as possible onto the horn. Tie a knot in the end of the casing. Pull up on the horn tight. Use a sausage pricker and poke a few holes in the end to let air escape. Take only a couple handfuls of meat out of the fridge at a time. The meat has to be very cold to run through the grinder well. Use a stuffer, or piece of dowel to shove meat down the throat of the grinder..
- Stuff with your right hand, and use your left hand to control the rate that the sausage fills the casing, and the rate that the casing comes off of the horn. You want to fill the casing well, but not too much. Casings that are too full will burst when you twist the links in. After a couple times you will get the feel for it. When the links are twisted you want a nice plump sausage inside of the casing. If your casing bursts, remove enough meat to tie a knot on either side of the rupture..
- Add meat back through the meat grinder and stuff again. This is a slow process so be patient..
- Stuff a good length of casing. When you have a couple feet stuffed, twist in your links. Decide the length of the links you want. Start at the end of the casing. Pinch the spot that you want to twist. Twist the link forward away from you 3 times. Pinch the next spot you want to twist. Twist opposite back towards you. Repeat this process for the entire casing until you reach the end. You want to keep pushing the meat inside the casing back towards the meat grinder..
- When you get close to the end of the casing, tie off the other end and finish twisting links..
- When all meat is cased, and all links are twisted, chill links in the refrigerator overnight. Try not to layer them too much. This let's the casings dry. Drying the casing keeps the sausage from unraveling on the ends when you cut the links apart..
- When casings are dried, use scissors to cut links apart. Cut off end knots as well. Prick twice on each side with a sausage pricker. This helps keep them from exploding while cooking. They are now ready to cook, or package and freeze. Note: these sausages do not have commercial binders in them. Overcooking can cause a grainy texture to the meat..
- Since I was cooking some fresh, I didn't twist links. I cooked the coil sausage whole..
- Heat a non stick pan over medium heat place the sausage in the pan and brown on both sides..
- Add 12 oz of flat beer. Cover and simmer until internal temperature hits 160..
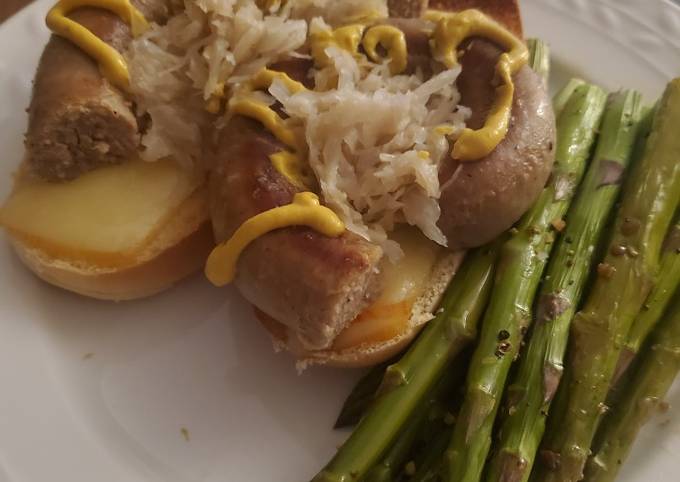
- At the same time toast buns. When toasted, melt cheese on them..
- When sausage is done, remove to a cutting board. Slice into serving size. Plate buns. Serve sausage on them open faced. Add mustard and sauerkraut. Serve immediately. Enjoy..
This recipe is a fun science experiment to try with the kids. Food is an integral part of Indian festivals. Diwali is a vibrant, colourful, joyous celebration expressed through the medium of food. Diwali can never be complete without the sweet and homemade snacks. This opens in a new window.